How Does the Project Work?
The demo integrates physical inputs with graphical visualization on the display. LEDs are used to simulate headlights, brake lights, and turn signals. Additionally, two endstops (one for the accelerator and one for the brake) and a three-position lever switch are used to control the left and right turn signals.
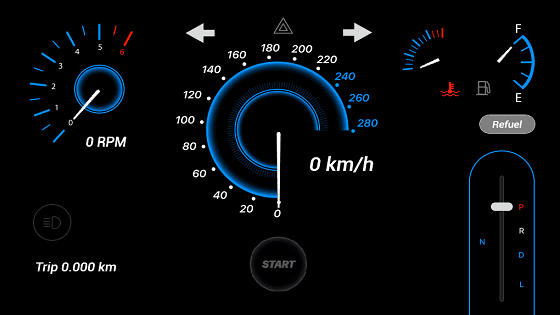
The display shows real-time updated gauges for RPM, speed, fuel level, and temperature based on system behavior. There are also buttons to turn the headlights on, activate the hazard lights, and a slider to select the gear in the automatic transmission (Park, Reverse, Neutral, Drive, and Low).
Feature Summary:
• Gauges: Dynamic indicators for RPM, speed, fuel level, and engine temperature.
• Gear simulation: Each mode has distinct behavior. In Neutral, only RPM increases; in Reverse, speed is limited; and in Drive and Low modes, gear shifts are simulated with RPM response.
• Fuel indicator: Fuel level decreases with acceleration. When it reaches the reserve, a blinking visual alert appears on the display.
• Trip counter: A digital display shows the actual distance traveled, calculated dynamically based on speed.
• Touch commands: Buttons to activate lights and a slider to change gear directly on the display.
• Serial communication: Data is exchanged between the display and the microcontroller using the Lumen Protocol library.
Components and Materials Used
• Hardware:
• Software:
How to Set Up the Project
Why Use This Project?
The Car Dashboard Demo is an excellent example of how smart displays can be applied in automotive systems. It combines an advanced graphical interface with logic embedded in the microcontroller, enabling real-time visualization of system behavior. This project is ideal for demonstration, educational use, prototyping, or commercial presentations. All of this is done using UnicView Studio, which simplifies the creation of the graphical interface, and the Lumen Protocol library, which ensures fast and efficient integration with the microcontroller.
Downloads and Resources
• Project on GitHub
 English